Vegan Meringue Cake with Sweet Lemon Ricotta and Berries

Vegan Pavlova

Pavlova cake is named after the Russian Ballerina, Anna Pavlova, from her time touring in Australia and New Zealand. Supposably, a chef at the Wellington hotel created the cake for the dancer, claiming it reminded him of her tutu!!

Because I adore ballet, and adore meringue, it only seemed logical we try to veganize this classic dessert.

Well like a lot of things I things I try and veganzie, this one took many attempts and the result wasn’t exactly like I had imagined, but eventually we got a cake we were happy with. Even though I could not quite get the marshmallow center I wanted, I got a delicious meringue cake, and I can live with that!

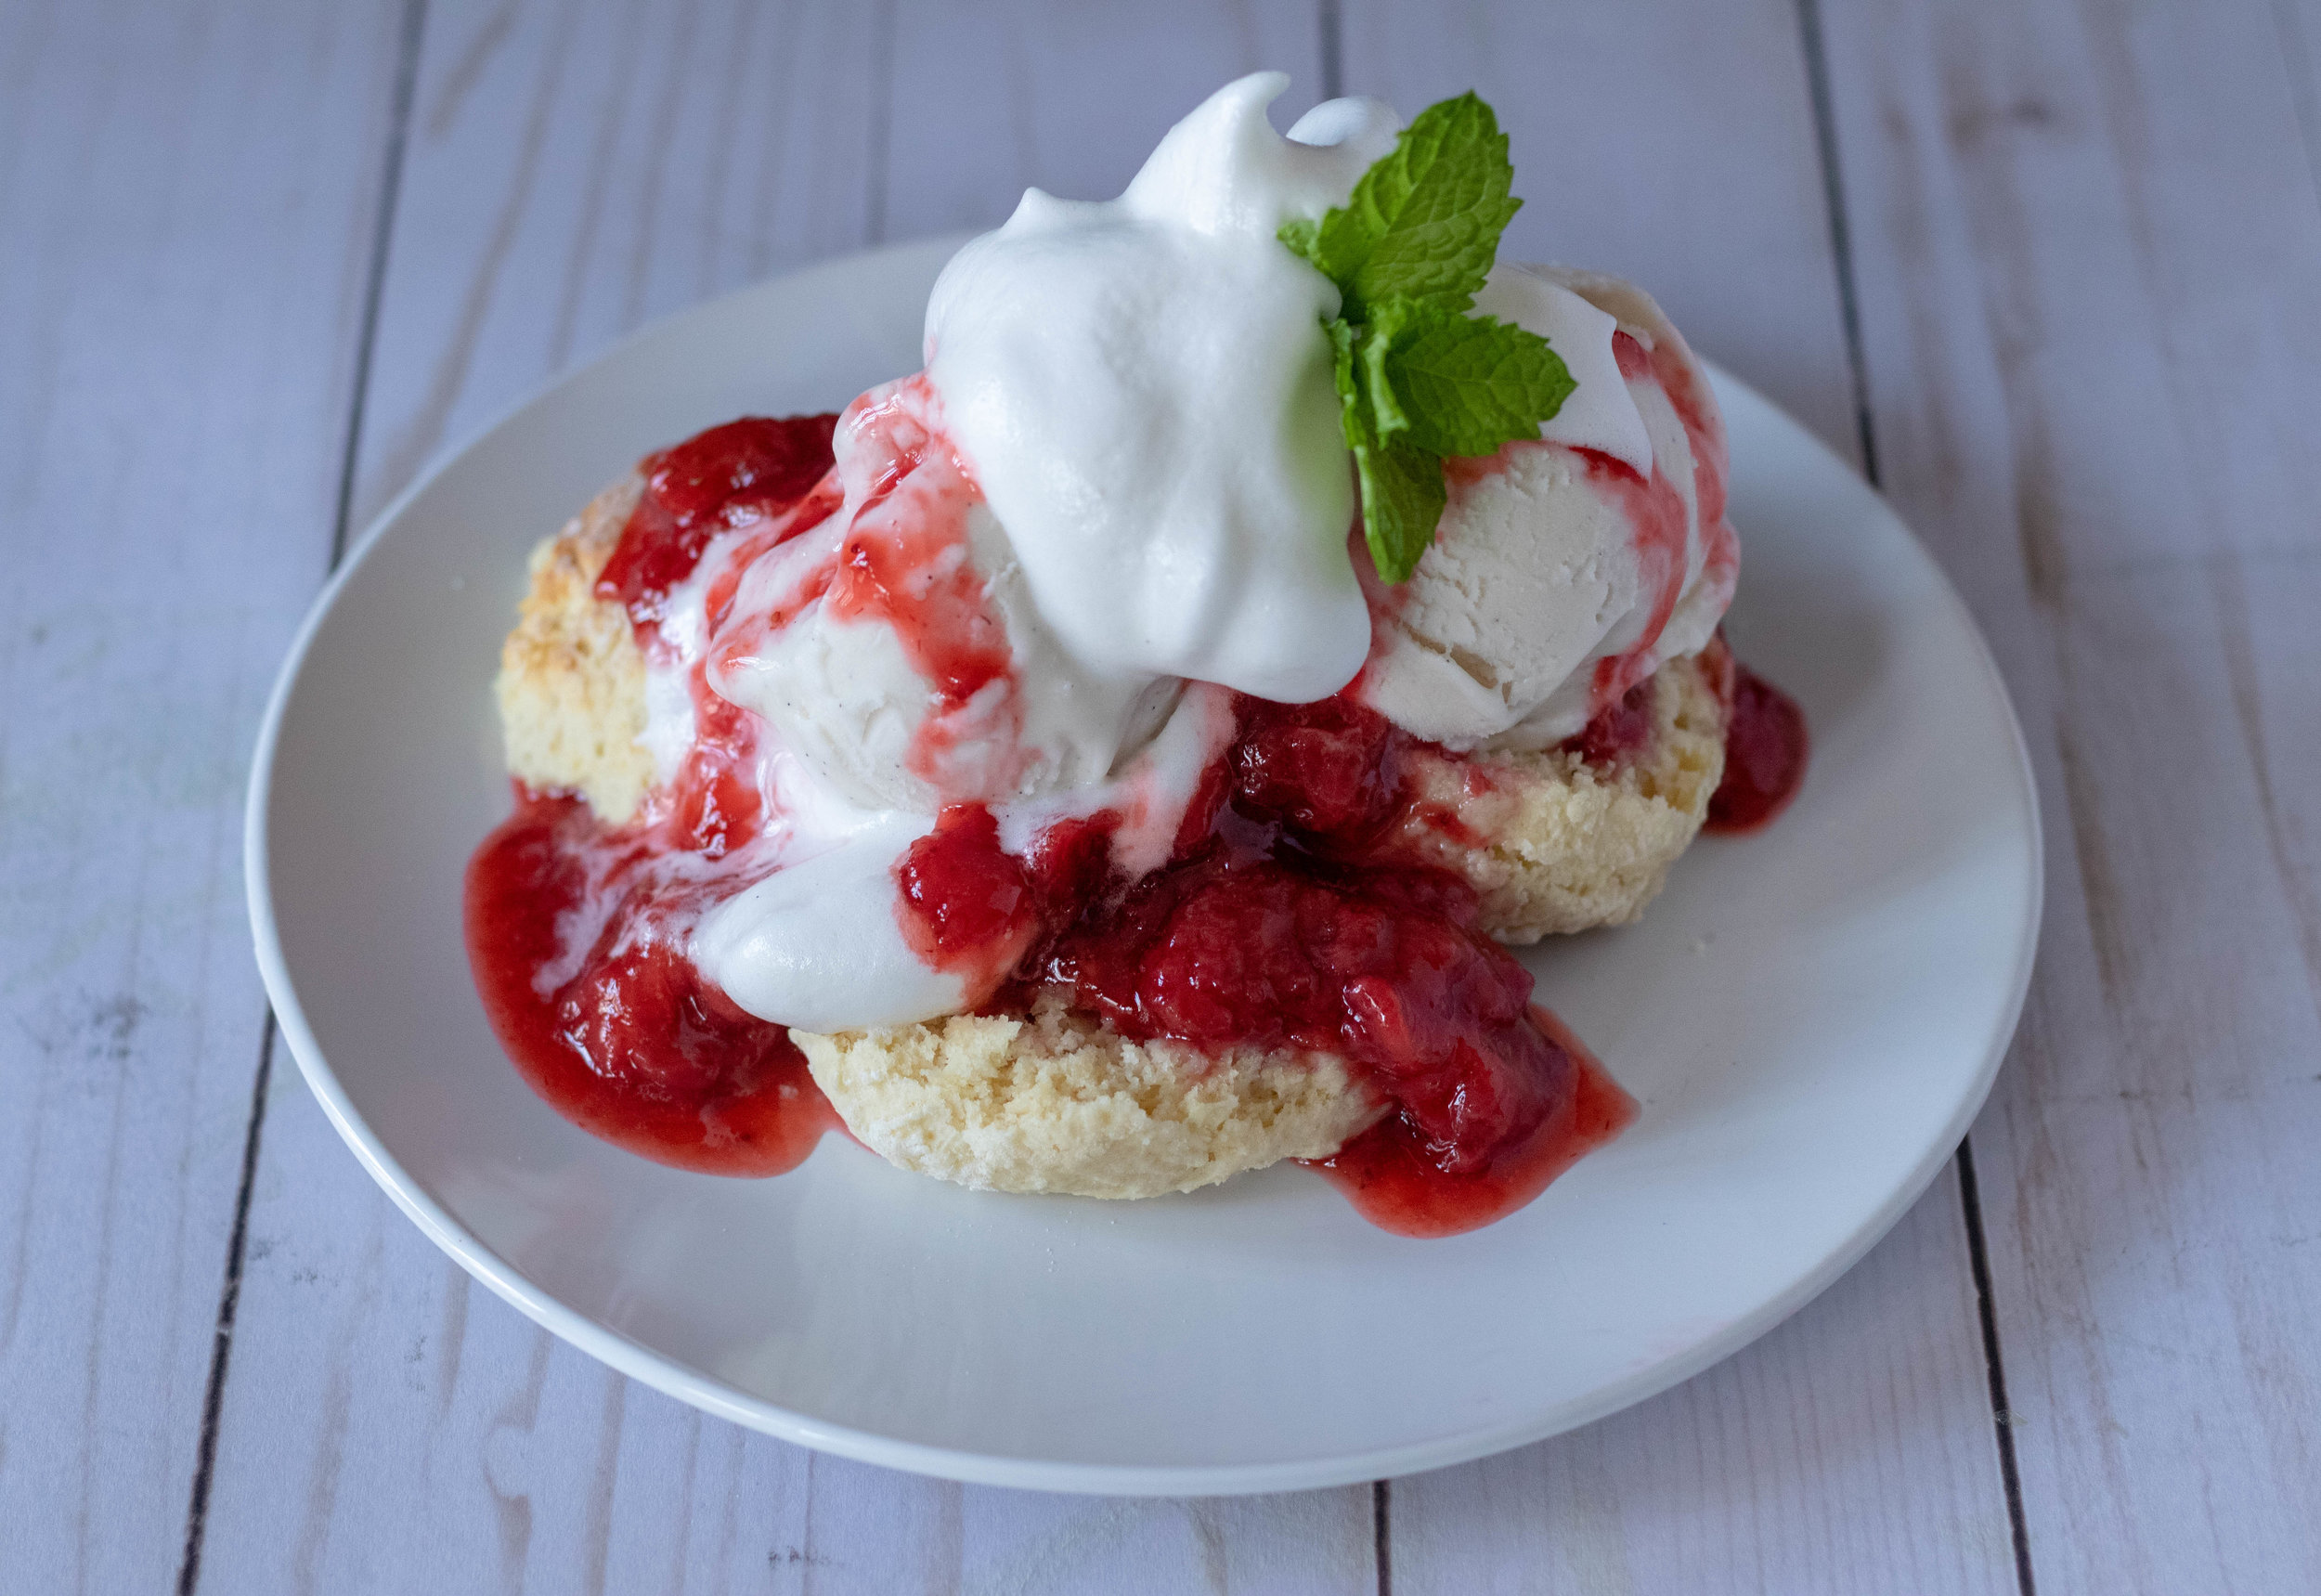
Traditional Pavlova is made with egg white meringue that is marshmalllowy inside. In this vegan version is we use sweet, whipped, aquafaba to replace the eggs and made a drier meringue to help hold its shape.

The result is a perfectly, light, delicate meringue cake, filled with sweet lemon tofu ricotta and fresh berries.

This cake requires patients as it takes a long time to bake and dry out. I promise it’s worth every minute it takes. This vegan Pavlova makes for the most impressively beautiful, light, and delicious dessert and will surely impress anyone who tries it!


INGREDIENTS:

  • Liquid from 1 can of chickpeas

  • 1 1/2 cups powdered sugar

  • 1/4 teaspoon cream of tarter

  • 1/2 teaspoon apple cider vinegar

  • 1 tablespoon tapioca starch

  • 3-4 cups mixed berries, strawberries, blueberries, black berries, or raspberries

  • Fresh mint for garnish

LEMON RICOTTA :

  • 1 block extra firm tofu

  • Juice from 1 lemon

  • Zest from 1 lemon

  • 1/4 cup maple syrup, or a few tablespoons agave


INSTRUCTIONS:

Preheat oven to 275 degrees

  1. Add chickpea liquid, powdered sugar, cream of tarter, vinegar, and tapioca starch to a stand mixer, and mix on medium speed for about 10 minutes or until a very stiff meringue has formed. If you need to use a hand electric mixer, add all ingredients to a large bowl and mix by hand until a stiff meringue has formed, don’t give up. It takes a while but will come together.

  2. Prepare 2 baking sheets by covering in parchment paper. Draw an 8 inch circle on each sheet of parchment then flip the sheet over. Divide the meringue between the 2 circle. Spread the meringue evenly to fit the circles using the back of a spoon.

  3. Bake the Pavlova for 2 1/2- 3 hours or until you can insert a tooth pick or cake tester into the center and the meringues are dry. Remove from the oven to cool completely. (ours took 3 hours but bake times will vary depending on ovens)

  4. Add the tofu, lemon and maple syrup to a food processor or high speed blender, and process until completely smooth.

  5. Divide the tofu ricotta in half. Lightly spread half of the ricotta over one of the meringues. Thinly slice some strawberries and evenly spread them over the ricotta. You can add some tother berries as well, just nestle them into the ricotta.

  6. Place the second meringue on top of the first. Add the other half of the ricotta to the center of the meringue and spread it out a little. Pile up the remaining fruit on top of the ricotta. Garnish with mint.

  7. Serve immediately. The liquid from the ricotta and fruit will eventually break down the meringues. If you wish to bake the meringues and serve later, store them in an airtight container and add ricotta and fruit when ready to serve. Any moisture in the air will cause the meringues to get sticky and they will no longer be dry and flakey, the way you want them to be. Storing them in an airtight container is essential!

  8. Slice to serve.

If you like this recipe, try these:

No Bake Vegan Strawberry Pie

Southern Vegan Strawberry Shortcake

Sweet Aquafaba Whip

Vegan Pavlova cut on a plate

vegan meringue cake with sweet lemon tofu ricotta and fresh berries

Vegan Meatball Sub Bake

Vegan Meatball Sub Bake

My oldest daughter’s favorite meal has always been a meatball sub.

I don’t blame her, they are delicious. That said, they are also messy and I have 4 kids to clean up after. So over the years I discovered this vegan meatball sub bake makes them just as happy as a big messy sub does.

It also works great for feeding the extra gaggle of teens that are often at my house. They don’t even care that is vegan, and often go back for seconds.

If you don’t want to use Beyond Burgers, then use any plant based meatball you prefer. A little heads up though, my local Costco has started selling packs of 8 beyond burgers for around $14!! Less than $2 a burger. So even if I use 4, this meal is still far cheaper than eating out!

I LOVE making meatballs with thawed Beyond Burgers because they remind me the most of real meatball.

We top the meatballs with our perfect all purpose vegan cheese sauce, after letting it get extra thick and stretchy! It makes the perfect gooey mozzarella for this recipe. Lastly, we top it with buttery, toasty garlic bread! I’m telling y’all, this dish will more than likely be a hit with who tries it, vegan or non vegan! So forget trying to bite into a messy meatball sub, and turn it into this vegan meatball sub bake!


INGREDIENTS:

  • 4 thawed Beyond Beef burgers, or a bag of your favorite frozen plant based meatballs

  • 1/4 cup panko bread crumbs

  • 1 teaspoon minced garlic

  • 1 teaspoon Italian seasoning (a mix of thyme, sage, basil, marjoram, rosemary, and oregano) if you do not have Italian seasoning feel free to add a combo of any of the listed spices

  • 1 teaspoon tomato paste

  • 1 flax egg

  • 1 loaf french bread

  • 1/2 batch All Purpose Vegan Cheese Sauce

  • 1-2 tablespoons vegan butter

THE SAUCE: ( or use a favorite pre-made sauce)

  • 1 onion, diced

  • 1 28 ounce can crushed tomatoes

  • 1 small 14.4 oz can diced tomatoes

  • 1/3 red wine (optional)

  • 2 teaspoons crushed garlic

  • 1 teaspoon salt

  • 2 teaspoons Italian seasoning


INSTRUCTIONS:

Meatballs:

  1. Mix thawed burgers, panko bread crumbs, garlic, spices, and flax egg together in a bowl.

  2. Once well combined, form meatballs with a small scoop, or spoon, and place them on a baking pan. You can line the pan with parchment paper for easier clean up.

  3. Bake at 350 degrees for 30 minutes.

Sauce: (you can also easily use store bought sauce)

  1. In a medium sized sauce pan, sauté onions and garlic in 1 teaspoon of oil, and a teaspoon of salt, until onions are translucent.

  2. Add the wine, and let it cook for 2 minutes.

  3. Add the remaining ingredients, and let the sauce simmer for 30 minutes.

  4. Add the cooked meatballs, and let simmer in the sauce for 15 minutes.

The Casserole:

Preheat oven to 350 degrees

  1. Scoop sauce and meatballs into a 9x13 or large casserole dish.

  2. Prepare cheese sauce according to directions, allowing it too cook until it is thick and stretchy.

  3. Evenly top the meatballs with dollops of the cheese sauce,

  4. Slice the french bread into 1/2- 1 inch thick slices and place evenly on top of the cheese sauce. Spread softened vegan butter over the bread. Sprinkle with garlic salt or any other seasoning you may like .

  5. Place in the oven on the middle rack and bake for around 20-25 minutes. You just want heat the casserole through and toast the bread.

    Serves 4-6

If you like this recipe, try these:

Beyond Meatball Stuffed Challah

Savory Cranberry Meatballs with Mashed Potatoes

Stewed Sauerkraut with Lentil Meatballs

Vegan Meatball Sub Bake

Vegan Meatball sub bake using beyond meat burgers

Vegan Banana Walnut Bread

Vegan Banana Walnut Bread Sliced

People are often amazed when I serve them vegan baked goods and after the fact, mention they are vegan.

Vegan baked goods can be every bit as good as non vegan if you know what you are doing, and most of the time nobody will ever even know the difference.

This vegan banana bread doesn’t even use an egg replacer and comes out just as delicious as any “regular” banana bread I have ever had.

You can mix in walnuts or replace them with chocolate chips, or any other nut or dried fruit you prefer. It’s moist, fluffy, just the right amount of sweet, and it is 100% vegan.

This bread also will freeze well, so maybe whip up a double batch if you have a bunch of bananas that are on their way out. One loaf for now, one for later. Or one for you, and one to convince, and hopefully impress a non vegan friend or neighbor.

Who knows, maybe all it would take is one convincing loaf of vegan banana bread to help them start to make some changes!


INGREDIENTS:

  • 1 cup all purpose white flour

  • 1 cup whole wheat flour

  • 3/4 cups brown sugar

  • 1/2 cup vegan butter, melted

  • 1 tablespoon baking powder

  • 1 teaspoon baking soda

  • 1/2 teaspoon salt

  • 1 teaspoon vanilla extract

  • 4 very ripe bananas

  • 3/4 cups chopped walnuts

  • 1/2 cup plant milk

  • 1 teaspoon vinegar


INSTRUCTIONS:

Preheat oven to 350 degrees

  1. Mash bananas in a medium sized bowl. Stir in the melted butter and vanilla extract.

  2. In a large bowl, mix both flours, sugar, salt, baking soda, and baking powder.

  3. Mix the vinegar with the milk and let it sit for a few minutes.

  4. Add the wet ingredients to the dry and stir until combined. Mix in the chopped nuts.

  5. Prepare a loaf pan by spraying with some oil or wiping oil inside the pan. Pour the batter into the pan and bake on the top rack for 45 - 55 minutes or until a toothpick inserted into the middle comes out clean.

  6. Allow bread to cool a bit before turning over onto a wire rack or plate to slice and serve.

If you like this recipe, try these:

Vegan Blueberry Crumble Muffins

Vegan Carrot Cake Biscuits with Maple Cashew Butter

Classic Vegan Cranberry Scones

Vegan Banana Walnut Bread cooling

easy vegan banana walnut bread. No egg replacer required

Vegan Angel Biscuits

vegan-angel-biscuits.jpg

My grandmother made biscuits 3 meals a day. They were farmers and biscuits or cornbread were really the only breads they ever had in the house. She also taught all of the kids and grandkids how to make biscuits when we were young.

Over they years I have made some changes to the recipe because of our diet changes, but they are basically just like she made them , and I could make those biscuits in my sleep.

SO, when I fist learned about an angel biscuit, I was instantly resistant! Who in the world makes southern biscuits with yeast!?!? For shame!! Yet, I bake so many yeast breads and was intrigued just enough, that when I had a few spare hours the other day, I decided to try and veganize an angel biscuit recipe I found in a magazine. I had seen recipes online and in cookbooks for years and just kept ignoring them. How stupid could I be.

These biscuits are SO GOOD! They are so light and fluffy, like a pillowy, buttery cloud. I imagine this is where they get the name. Now, would I forsake my tried and true grandmothers biscuit recipe and replace it with vegan angel biscuits? Shut your mouth! I would never!! They are still one of my all time favorite foods, they are quick and easy and perfect. But these vegan angel biscuits are like a perfect marriage between a fluffy yeast roll and a biscuit. Something entirely different!

They require more time than our regular vegan biscuits because they contain yeast and that means they need time to rise before baking. But let me assure you they are worth the wait.

I guess the moral of this story is that I have never met a biscuit that I don’t like, no matter if they are my grandmothers recipe, or these cloud like yeasty vegan angel biscuits. I’m telling you, if you have never tried an angel biscuit, using one of my grandmothers favorite phrases, don’t knock it til you try it, y’all, because in this case you will surely be missing out.


INGREDIENTS:

  • 1/2 cup warm water (around 110 degrees) I just use hot tap water.

  • 2 1/2 teaspoons dry active yeast

  • 1 teaspoon sugar

  • 5 cups all purpose flour

  • 2 tablespoons sugar

  • 5 teaspoons baking powder

  • 2 teaspoons salt

  • 1 teaspoons baking soda

  • 3/4 cups vegan butter

  • 2 cups plant based milk

  • 2 teaspoons vinegar

  • 2 tablespoons melted butter

vegan-angel-biscuit.jpg

INSTRUCITONS:

  1. Add water, yeast, and 1 teaspoons of sugar to a bowl. Let them mixture sit for about 5 minutes. You will know its ready once the top is foamy or bubbly. If it does not appear to be foamy, you may have gotten the water too hot and killed the yeast. If thats the case, start over.

  2. Mix milk and vinegar and let it sit for five minutes.

  3. In a large bowl combine flour, salt, sugar, baking powder and baking soda. Add the butter, and using your hands or a pastry blender, cut the butter into the flour until it is crumbly.

  4. Add the yeast mixture and milk to the flour and stir just until everything is well incorporated. Cover the bowl with plastic wrap and pop it in the fridge for 2 hours, or up to 4 days. I like to start this dough at night so it is ready when I wake up, because I am far to impatient to wait the 2 hours in the morning.

  5. Once you are ready to use the dough preheat oven to 400 degrees. Turn dough out onto a clean and floured surface. It will be sticky so flour your hands as well. Pat the dough out into about a 1 inch thick circle. Cut biscuits with a 2 inch biscuit cutter or using the rim of a glass. Pat scrap dough back into a circle and cut remaining biscuits. You should be able to get about a dozen biscuits. Place biscuits touching in a 10-12 inch cast iron pan. If you do not have a cast iron, you can place them touching on a baking sheet that has been lined with parchment paper or a silicon baking mat.

  6. Brush the tops of the biscuits with melted butter then place on the top rack of your oven.

  7. Bake biscuits for about 20 minutes. You can poke a cake tester or tooth pick into one of the biscuits if you are not sure they are done on the inside. If they are browning too quickly, you can move them to the middle rack for the remainder of the bake.

  8. Allow biscuits to cool some before serving.

If you like this recipe, try these:

Fluffy Southern Vegan Biscuits

Vegan Carrot Cake Biscuits with Maple Cashew Butter

Vegan Deluxe Biscuits and Gravy

vegan-angel-biscuit-pan.jpg

perfectly light and fluffy vegan angel biscuits. Yeast biscuits

Vegan Blueberry Crumble Muffins

Vegan Blueberry Crumble Muffins

Top of the muffin to ya (any Seinfeld fans out there) If I am being perfectly honest, the top of the muffin is all I really care about.

Don’t get me wrong, I will eat the whole thing, stump included, but really just because I don’t want to be wasteful.

I also only like crumble top muffins. I don’t think I have ordered a muffin from a bakery in years that did not have a crumble top, and sure haven’t baked any. We recently picked 16 lbs of organic blueberries ( I know…that is a lot of blueberries) so that we could freeze them and enjoy them throughout the summer. There are 6 of us so it actually won’t take that long to go through 16 lbs of any fruit. Needless to say I have been making all kinds of blueberry treats over the last couple of months, and knew I had to bake up a big batch of the only muffin I really love. Vegan blueberry crumble muffins!

This recipe makes a dozen and a half muffins. I really don’t see the point wasting my time mixing up half dozen muffins when I can use the same time and effort to make triple that number when they freeze so well. Just drop the extra in a freezer bag, and thaw and reheat them whenever you are in a muffin mood! Easy!

If by some odd chance you don’t like blueberries or have a freezer full of strawberries or raspberries, feel free to use those. I’m not berry biased here. All berries are created equal! Just remember if you used frozen berries of any kind in this recipe, you need to thaw and pour off any liquid before using. Otherwise, frozen berries work just fine!

So go bake yourself up a batch of crumbly, sweet, summer berry muffins, and devour them top to stump!


INGREDIENTS:

  • 3 cups all purpose flour

  • 1 cup sugar

  • 1 teaspoon salt

  • 1 teaspoon vanilla extract

  • 1 tablespoon baking powder

  • 1/2 cup neutral tasting oil

  • 1 flax egg or powdered egg replacer

  • 2/3 cup milk

  • 2 teaspoons apple cider vinegar

  • 2 cups fresh blueberries or frozen blueberries thawed, and liquid drained

CRUMBLE:

  • 1 cup brown sugar

  • 1 cup flour

  • 1/2 cup cold vegan butter

  • 2 teaspoons cinnamon

  • pinch or nutmeg


INSTRUCTIONS:

Preheat oven to 350 degrees

  1. Combine dry ingredients for muffins in a large bowl. Add the blueberries and toss them around to coat them in flour. If you are using frozen blueberries, you can thaw them and drain the extra liquid off of them before using.

  2. Add the vinegar to the milk and let it sit for a few minutes to curdle. ( you are basically making buttermilk)

  3. Add the milk, egg replacer, vanilla, and oil to the dry ingredients, and stir the batter unit well combined. Just be careful not to smash all of the blueberries while stirring. If the muffin batter seems too thick, you can always add another splash of milk.

  4. In another bowl combine brown sugar, flour, cinnamon and nutmeg for the crumble. Add the butter and mix it in ( I use my hands) unit you have a crumbly consistency.

  5. This recipe will make about 18 standard sized muffins, or around a dozen jumbo muffins. Line muffin tin with liners and fill the the cups almost to the top, leaving little room for the crumble.

  6. Top each muffin with equal portions of the crumble.

  7. Bake muffins for 30-35 minutes or until a tooth pick poked in the center of a muffin comes out clean.

  8. Allow muffins to cool a bit before serving. Store in an airtight container at room temperature or in the freezer in a freezer bag for up to 3 months.

If you like this recipe, try these:

Vegan Blueberry Pancakes with Sweet Lemon Ricotta

Vegan Carrot Cake Biscuits with Maple Cashew Butter

Classic Vegan Cranberry Scone

Vegan Blueberry Crumble Muffins

vegan blueberry crumble muffins

No Bake Vegan Strawberry Pie

no-bake-vegan-strawberry-pie.jpg

Easy desserts are my favorite desserts! This no bake strawberry pie is so easy and perfect for summertime entertaining, or a quick sweet treat.

We made the filling with tofu and you would never know! Its sweet, creamy, and packed with strawberry flavor thanks to using freeze dried strawberries that pack a punch of flavor.

We used vanilla sandwich cookies for the perfect simple crust, and topped the pie with easy sweet aquafaba whip.

This dessert is light and fluffy, sweet, and super simple! Just mix it all up, pop it in the fridge, and you will be eating pie before you know it, without ever having to turn on your oven!


INGREDIENTS:

  • 1 block extra firm tofu

  • 26 vegan vanilla sandwich cookies

  • 2-3 tablespoons softened vegan butter

  • 1 1/2 cups freeze dried strawberries

  • 3/4 cups powdered sugar

  • 1 teaspoon vanilla extract

  • 2 tablespoons refined coconut oil

  • juice from 1/2 lemon

  • 1 batch Sweet Aquafaba Whip

no-bake-vegan-strawberry-cream-pie-pan.jpg

INSTRUCTIONS:

  1. Place cookies in a food processor or high speed blender, and blend until the cookies are totally broken down into a crumb consistency.

  2. Mix butter into the cookies crumbs. You want softened, not melted butter. The mixture should stick together when pressing into a pie pan. If using double stuffed sandwich cookies, you will need less butter. If using original, you will need more.

  3. Press the cookie mixture evenly into a pie pan.

  4. Drain tofu, but you do not need to press it.

  5. In a food processor or high speed blender, add the tofu, powdered sugar, strawberries, oil, lemon, and vanilla. Process until the mixture is creamy and smooth.

  6. Transfer the strawberry mixture in to the pie crust, and pop in the fridge for a few hours to allow the crust and filling to set a bit. The butter in the crust and the oil in the pie will help firm the pie up once chilled.

  7. Prepare Sweet Aquafaba whip according to instructions, and top pie with the whip before serving. You can dust some crushed up freeze dried strawberries over the whip for garnish or garnish with fresh or freeze dried strawberries. Store leftovers in the fridge for a day or two.

If you like this recipe, try these:

Vegan Lime Mojito Cupcakes

Southern Vegan Strawberry Shortcake

Matcha White Chocolate Peanut Butter Cups

no-bake-vegan-strawberry-cream-pie-whole.jpg

Easy no bake vegan strawberry cream pie, with sweet aquafaba whip

Smoky Coconut Milk Chile Cheddar Cheese

Vegan Smokey Chile Cheddar Cheese sliced

I love experimenting with different vegan cheese flavors and bases. I really love using coconut milk because it’s easy and affordable.

I am often asked if these cheeses have a strong coconut flavor and the answer is, not really. I always used refined coconut oil which has little to no coconut flavor at all, and all of the spices and other ingredients in the cheese mask the flavor of the milk very well.

I love this particular chile cheddar for its deep smokey, peppery flavor without a lot of heat. You could always bump up the heat in this cheese by adding a few slashes of your favorite hot sauce. My kids and husband are not big fans of eye watering, nose running pepper heat, so this cheese has all the flavor without any of the pain.

We added reconstituted dried chiles and a can of small green chiles for the perfect smokey and tangy combo. This vegan cheese will slice, shred, and even remelt, making it perfect for quesadillas, enchiladas, tacos, sandwiches, or just snacking!

This is a quick set cheese and is so simple to make, there is no reason to keep overpaying for store bought vegan cheese! You can have delicious vegan cheese, start to finish in about 2 hours, and for a quarter of the grocery store price!


INGREDIENTS:

  • 1 can full fat coconut milk

  • 2 tablespoons agar powder

  • 2 teaspoons light miso paste

  • 2 tablespoons apple cider vinegar

  • 1 teaspoon salt

  • 1/4 cup plus 1 tablespoon nutritional yeast

  • 1 teaspoon turmeric

  • 2 teaspoons smoked paprika

  • 1 small can green chiles (4 oz can)

  • 2 dried chili peppers

  • 1/4 cup refined coconut oil

  • optional: a few shakes of your favorite hot sauce

Vegan Smokey Chile Cheddar Cheese on a cracker

INSTRUCTIONS:

  1. Place dried chiles in a medium sized bowl. Pour enough boiling water over the peppers to cover and place a plate on top of the bowl. Let the peppers soak for about 20 minutes

  2. In a food processor or high speed blender, add all of the ingredients EXCEPT the milk, and agar and peppers.

  3. Pulse a few times to mix it all up.

  4. After the peppers are done soaking and have softened, remove from the water. Cut the pepper open and remove the stem and the seeds. I just run a paper towel down the inside of the peppers to wipe out the seeds.

  5. Drop the whole peppers into the food processor. Open the green chiles and dump them onto several folded up paper towels or a clean kitchen towel just to absorb some of the liquid. Add them to the food processor as well. Pulse until the peppers are broken down.

  6. Now add the milk, and agar to a medium sauce pan and bring to a boil. Reduce heat and simmer until mixture thickens to the constancy of a thin pudding. This only takes a few minutes.

  7. Add the milk mixture to the ingredients in the food processor, and mix for about a minute. The mixture will quickly begin to thicken as agar begins to solidify at room temperature.

  8. Transfer to the mixture to several small bowls or cheese molds. I can fill three small bowls with this recipe.

  9. Allow the cheese to harden in the refrigerator uncovered for a few hours.

  10. Store in an airtight container in the fridge for about a week or so.

If you like this recipe, try these:

Coconut Milk Colby Jack Cheese

Coconut Milk Pepper Jack

Smokey Cashew Cheddar

A cheese board with vegan coconut chile cheddar cheese surrounded by chiles and crackers

smokey coconut milk chile cheddar vegan cheese

Vegan Coconut Chocolate Blondie Skillet Sundae

A closeup of the ice cream on a Vegan Coconut Chocolate Blondie Skillet Sundae

I waited tables for years durning college at Chili's. You know “I want my baby back, baby back….” that Chili’s.

One of our most popular desserts at the time was something called the Paradise Pie. It was basically a chocolate coconut blondie in a cinnamon buttery skillet, topped with ice cream, caramel, and fudge sauce, sprinkled in chopped nuts.

How many of these did I eat over the years I worked there? I would honestly hate to know the real number. Lets just say A LOT, because they are addictive. My husband (who also spent some time waiting tables there) and I were talking about this glorious dessert the other day with our kids and decided it had to be veganized. They had to know the glory and wonder of this perfect dessert.

The 13 year old baking wonder had already perfected an amazing vegan blondie recipe, so I had her add coconut and chocolate chips and a graham cracker crust. The result was perfection and tasted just like I remembered it. Mind you it has been a gazillion years at least since I have had the real thing. We topped it with vanilla ice cream and our easy vegan caramel and fudge sauce recipes, and ate ourselves sick.

The kids were fans for sure, and my husband and I were more than excited!

If you have had a Paradise Pie, then you know! If not, then let me urge you to blow your diet on this! You might regret it a little, but will probably get over it pretty fast.

Also thanks Chili’s for helping me pay my rent through college and for all the friends I made working there, that I am still friends with to this day. Lets share a vegan Paradise Pie the next time we get together!


INGREDIENTS:

  • 1 cup melted vegan butter

  • 2 cups brown sugar

  • 2 egg replacers (powdered or flax egg)

  • 2 teaspoons vanila extract

  • 2 cups all purpose flour

  • 1 teaspoon salt

  • 1/2 cup mini vegan chocolate chips

  • 1/3 cup shredded coconut

  • 1 sleeve graham crackers

  • 3 tablespoons melted butter

  • 1 batch vegan fudge sauce

  • 1 batch vegan caramel sauce

  • plant based vanilla ice cream

  • 1/4 cup chopped walnuts

  • 2 tablespoons butter mixed with 1 teaspoon cinnamon (for the skillet)

A bite of Vegan Coconut Chocolate Blondie Skillet Sundae on a spoon

A bite of Vegan Coconut Chocolate Blondie Skillet Sundae on a spoon

INSTRUCTIONS:

Preheat oven to 350 degrees

  1. Place graham crackers in a blender or food process and pulse until they are finely ground to a sandy consistency. Mix in the 3 tablespoons of melted butter. Press the mixture into a 8x8 baking pan and bake for 10 minutes.

  2. While the crust is baking, mix the sugar with the melted butter, and vanilla. Mix in the flour and salt until well combined. Stir in the coconut and chocolate chips.

  3. Pour batter over the graham cracker crust and bake for 45 minutes to 1 hour on the middle oven rack. The blondies will seem a little gooey and soft even once they are done, but will firm up once cooled.

  4. Allow blondies to cool before cutting.

  5. Place the butter and cinnamon mixture in an iron skillet. You can use a small casserole dish as well if you do not have a skillet. Pop the skillet into the oven and let the butter melt. Place 4-5 blondies in the skillet and pop back in the oven for about 5 minutes.

  6. Remove from oven and top with 3-4 scoops of ice cream, fudge sauce, caramel sauce, and chopped walnuts.

  7. Serves about 4. You can always add more blondies and more toppings to the skillet to serve more.

If you like this recipe, try these:

Nostalgic Vegan Ice Cream Cake ( Dairy Queen)

Vegan Southern Strawberry Shortcake

TYPE META DESCRIPTION HERE

Easy Vegan Fudge Sauce

Vegan fudge sauce dripping from a spoon

If I am being perfectly honest, I just want to pour this vegan fudge sauce over everything in my kitchen.

Fruit, ice cream, pretzels, vegan marshmallow….we dip cookies in it, pour it over our skillet blondies, use it in our veganized Dairy Queen Classic Ice Cream Cake, and eat it by the spoon full right out of the fridge.

I say this sauce lasts about a week in the fridge, but how would I know, really? It has never lasted more than a few days in my house, so that is honestly a guess.

We made this fudge sauce full fat coconut milk, coconut oil, chocolate chips, and corn syrup so its extra thick and rich. Just the way it should be!!

This vegan fudge sauce is gooey, creamy, thick, chocolatey perfection! You may just want to go ahead and double the batch. You know, one batch for you, one for everyone else.


INGREDIENTS:

  • 3 tablespoons white sugar

  • 1/2 cup light corn syrup

  • 1/4 cup dark cocoa powder

  • 1 cup chopped vegan dark chocolate or chocolate chips

  • 2/3 cups full fat coconut milk

  • 1 teaspoon vanilla extract

  • 1/3 cup coconut oil


INSTRUCTIONS:

  1. Add all ingredients expect chopped chocolate and vanilla to a medium size sauce pan.

  2. Heat over medium heat until the sugar has melted and the mixture has come to a simmer.

  3. Mix in the chopped chocolate and vanilla. Stir unit the chocolate has melted and the fudge is smooth and creamy.

  4. Allow to cool before transferring to an airtight container. Store in the fridge for about a week.

If you like this recipe, try these:

Nostalgic Vegan Ice Cream Cake (Dairy Queen)

Vegan Caramel Sacue

Easy vegan chocolate fudge sauce

Vegan Stuffed Crust Pizza

Vegan Stuffed Crust Pizza

What’s better than homemade vegan pizza? Well how about homemade STUFFED CRUST vegan pizza!

That’s right, we stuffed our easy vegan all purpose cheese sauce right into the crust! I make a ton of vegan cheeses, even vegan mozzarella that shreds and slices, but honestly this cheese sauce is always my preference for pizza. This cheese is gooey, stretchy, cheesy perfection! No need to ever try another vegan pizza cheese recipes, I promise.

We love pizza night in our house. It’s way cheaper than delivery, plus homemade dough is super simple to make, and everyone gets exactly what they want on top! Win, Win, Win.

If you are feeling too lazy to make your own dough ( I do not judge, really I don’t ) most grocery stores sell a pre-made pizza dough these days.It’s normally vegan but just check the ingredients to make sure!

Plus when you make pizza at home get to add whatever toppings you like, all the cheese you want, and it won’t cost you an arm and leg, because we all know everyone loves to overcharge for vegan food. ( I should write a whole blog post just about how badly that annoys me)

So ditch the pizza delivery, and make pizza night an event at your house with this perfectly gooey, cheesy stuffed crust vegan pizza. I promise its totally worth the effort!!


INGREDIENTS:

The Dough:

  • 3/4 cups warm water ( around 110 degrees)

  • 2 1/2 teaspoons dry active yeast

  • 2 cups all purpose flour

  • 2 teaspoons sugar

  • 1 teaspoon salt

  • 3 tablespoons oil.

Vegan Stuffed Crust Pizza cheese coming out of the crust

INSTRUCTIONS:

  1. Start by adding warm water, yeast, and sugar to a large bowl. Let it sit for about 10 minutes. The yeast should have created a bubbly foam on top. If the yeast did not bubble and foam it is likely that the water was too hot, and it killed the yeast. I typically just use hot tap water to get the right temp.

  2. Add the yeast mixture and remaining dough ingredients to a stand mixer and mix on medium for serval minutes to allow the dough to knead. If the dough is sticking to the sides of the bowl, add a few extra tablespoons of flour. Your goal is a soft dough, but one not sticky. If you do not have a stand mixer, you can mix the ingredients in a bowl and turn the dough out onto a clean, floured surface to knead for 3-5 minutes.

  3. Clean out the bowl you used for the water and yeast. Dry it well. and coat the bowl with a little oil. Place the dough into the bowl and cover with plastic wrap or a damp towel. Let the dough rise for about an hour or until it had doubled in size. I place my dough in my oven on the bread proof setting, If you do not have a proof setting, you can just place it in oven (turned off) and allow to rise.

  4. Prepare cheese sauce according to directions while dough is rising. You want the sauce a little on the thicker side for this recipe.

  5. Preheat oven to 450 degrees

  6. Once dough has doubled in size, turn out onto a clean floured surface and punch the dough down. Stretch the dough into a circle using you hands. The dough will need to be and inch or 2 bigger than your pizza pan. Let gravity work for you when stretching the dough. Sprinkle the pizza pan with a little corn meal if you have it, to help keep the dough from sticking.

  7. Make a ring of cheese sauce about once inch away from the edge of the dough, then fold the excess dough over the cheese and press down well to seal. Make sure you have a nice seal with the dough, or it will pop open and cheese will ooze everywhere while baking. You may have to pinch the dough a bit to make sure it seals.

  8. Spread sauce over dough, and top with cheese sauce and whatever toppings you like. Bake on the top rack of your oven for 15-25 minutes, or until the crust has browned and the cheese is nice and bubbly and browning. Cook time vill vary depending on thickness of the crust.

  9. Allow to cool some before cutting and serving

If you like this recipe, try these:

Muffin Cup Vegan Lasagna

Vegan Italian Noodle Bake

Vegan Italian Potato Roll Up

Vegan Stuffed Crust Pizza

Vegan stuffed crust pizza with the perrect easy all purpose vegan cheese sacue and homemade vegan dough

Vegan Caramel Sauce

Vegan Caramel Sauce drizzled on pumpkin bread pudding.

Vegan caramel sauce is so easy make, and so delicious.

We have tried many methods over the years and have settled on this recipe that is a combo of some of our favorite attempts.

This vegan caramel sauce is thick and gooey, with a hint of salt and cinnamon. We used full fat coconut milk so its extra rich and creamy plus some starch to make sure its plenty thick!

Its perfect for topping bread puddings, cakes, ice cream, brownies, anything you can think of. It even makes a delicious coffee drink drizzle.

You can whip up a batch in not time, and keep in the fridge for those late night bowls of ice cream, or dip one of our vegan churro ice cream sandwiches in it. Hey, I’m not judging, I’m right there with you. Caramel makes the worst day better!


INGREDIENTS:

  • 1 cup full fat coconut milk or cream (the kind in a can, shaken well)

  • 3/4 cups brown sugar

  • 1 teaspoon vanilla extract

  • pinch of salt

  • 2 teaspoons tapioca or corn starch

  • 1 teaspoon cinnamon (optional)


INSTRUCTIONS:

  1. Place brown sugar and starch in a medium size pot over medium heat, and allow it to cook while whisking for about a minute.

  2. Reduce the heat to low and add the coconut milk, salt and cinnamon.

  3. Whisk and Simmer for about 15 minutes until the caramel begins to thicken and sticks to the back of the spoon. Stir in the vanilla and allow to cool.

  4. Store in an airtight container in the fridge.

If you like this recipe, try these:

Vegan Lemon Curd

Vegan Churro Ice Cream Sandwiches

Chocolate. Peanut Butter, Banana “Nice Cream”

The Pumpkin Spice Bread Pudding featured in this picture is available in our Fall and Winter Holiday Menu E-Book. This E-book is a full holiday menu complete with 34 recipes including a main dish, sides, desserts, and cocktails.

Easy vegan caramel sauce with coconut cream and cinnamon

Pulled Jackfruit Mexican Torta

Pulled Jackfruit Mexican Torta on French Bread

We have some of the greatest neighbors and friends I could have ever hoped for, from a wide array of cultures.

Typically when we get together with friends from our street, food is involved. Really, really good food. Our friends Lissi and Craig love food just as much as we do, and we often share recipes back and forth. They are not vegan, but have started adding more plant based meals into their rotation, and often challenge me to veganize things I would have never considered.

Lissi was born and raised in Mexico, and she is constantly teaching me about her upbringing through food. Most recently she suggested I make a vegan version of a Mexican Torta using jackfruit. I had never had a torta, let alone had any idea what went on one, until she explained it. She told me she grew up going with her godparents in Juarez, to a place called Parque Burunda just to get tortas when she was a kid.

Tortas typically have meat, beans, mayo, avocado, and some kind of lettuce, tomato, pickled jalapeño combo on them. They are normally severed on a bolillo roll that is a lot like a french baguette. If you have a Mexican market near you, you should be able to find bolillo. If not, french bread works well too. You are looking for a bread with a crusty outside and soft inside.

I honestly think the refried beans are what makes this sandwich. My love for sandwiches runs deep, and this sandwich is now on my top favorites. It is so flipping good, y’all!!! The jackfruit comes together fairly quickly, and is perfectly tender, seasoned with a spicy kick. We opted for a light slaw mix instead of lettuce for an added tangy crunch, and it works so well.

So if you are clueless to a Mexican Torta like I was, then I can’t urge you enough to give this delicious sandwich a try. Lissi knows what she is doing in the kitchen, and has never once steered me wrong. I could not be more thankful for she and Craig, and the rest of our amazing neighbors, and all of the great meals we share together!


INGREDIENTS:

  • 4 - 6 Bolillo, or 2 sticks of french bread

  • 2 cans jackfruit in brine

  • 1 larger onion, sliced thinly

  • 1 small can green chilies

  • 2 teaspoons each, chili powder, cumin, smoked paprika, minced garlic

  • 1 teaspoon black pepper

  • 2 teaspoons vegetable better than bouillon

  • 1/2 cup water

  • 1 can vegan refried beans

  • 4 - 6 teaspoons vegan mayo

  • 2 avocados

  • Juice from 1 lime

EASY SLAW:

  • 3 cups chopped cabbage

  • 1/2 red onion thinly sliced

  • 1/3 cup chopped cilantro

  • juice from 1 lime

  • 1/2 jalapeño, seeded and finely diced

  • salt and pepper to taste,

Bolillo Roll

INSTRUCTIONS:

  1. Drain jackfruit and rinse. Shred the fruit between your fingers over a bowl, or chop with a knife. I find using your hands works more easily and quickly for shredding the jackfruit.

  2. Heat large pot or dutch oven over medium heat. Add a few teaspoons of oil. Once oil is hot add the onions and the can of chilies. Let the onions cook until translucent and soft.

  3. Add the shredded jackfruit to the pot along with the seasonings, lime juice, Better Than Bouillon, and water. Reduce the heat to low, and let the mixture simmer for 30 minutes with a lid on. If all of the liquid cooks down and it begins to seem dry, add a little more water and let it continue simmering.

  4. Prepare the slaw by mixing all of the ingredients in a large bowl. Salt and pepper to taste.

  5. To assemble the sandwiches, spread a teaspoon of mayo on one side of bun, spread a few tablespoons of beans on the other. Top with jackfruit, slaw, and slices of avocado. You can add extra cilantro if you like, and even slices of tomato or extra jalapeños.

Serves 4 - 6.

If you like this recipe, try these:

Open Faced Vegan Roast “Beef” Sandwich with Jackfruit

Vegan Mexican Street Corn (Elotes)

BBQ Jackfruit Sandwich

Pulled Jackfruit Mexican Torta cut in half.

spicy pulled jacfuit mexican torta topped with lime slaw, vegan mayo, refried beans, and avaocado.

Vegan Lime Mojito Cupcakes

An array of vegan mojito cupcakes garnished with mint and a lime

One of my all time favorite cocktails is a minty lime mojito.

They are truly the perfect refreshing summertime drink! So we decided why not turn our favorite drink into a deliciously fresh cupcake, no booze required.

It’s the best of both worlds, and even those who do not drink alcohol can enjoy these perfectly soft lime cupcakes toped with minty lime buttercream.

These vegan mojito cupcakes are so tasty, and pretty cute too! They would be perfect for a wedding or baby shower, or a summer BBQ served with a nice tall, ice cold mojito!

I mean I can totally get behind eating a delicious mojito cupcake while sipping my favorite cocktail or mocktail. Seems like a no brainer, really. So cheers to summer, and cheers to mojitos making not only a delicious drink, but darn good cupcake, too!


INGREDIENTS:

  • 3 cups all purpose flour

  • 2 cups white sugar

  • 1 1/2 teaspoons baking powder

  • 1 teaspoon baking soda

  • 1/2 teaspoon salt

  • 2/3 cups lime juice

  • zest from 2 limes

  • 2 cups plant milk (we like to bake with oat milk)

  • 1/2 cup melted vegan butter

  • 1 teaspoons vanilla extract

  • extra lime wedges, and mint leaves for garnish.

  • optional: paper straws for decoration

MINTY LIME BUTTERCREAM:

  • 1/2 cup vegan butter

  • 1/2 cup shortening

  • 5-6 cups powdered sugar

  • 1 teaspoon vanilla

  • zest from 1 lime

  • juice from 1/2 lime

  • 1-2 tablespoons finely diced mint leaves.

An overhead look of vegan mojito cupcakes.

INSTRUCTIONS:

PREHEAT OVEN TO 350 DEGREES

  1. In a large bowl, whisk together dry cake ingredients. In a smaller bowl, whisk together the wet ingredients.

  2. Combine the wet ingredients into the dry and mix until well combined.

  3. Line a muffin tin with 24 cupcake liners. We actually have a tin that holds 2 dozen cupcakes, but if yours holds 1 dozen, you will need to bake in batches.

  4. Fill the cups 3/4 of the way full. Bake for 25 to 30 minutes or until a toothpick inserted in the middle of one of the cupcakes comes out clean.

  5. Allow the cupcakes to cool completely.

  6. In a stand mixer, or using a hand mixer, cream together the butter and shortening. Add in the vanilla, lime zest, juice, and mint. Begin adding the powdered sugar a little at a time and beat it in until the frosting is the desired stiffness.

  7. Pipe or spread frosting onto cooled cupcakes and garnish with a wedge of fresh lime, and mint leaves. We also quartered paper straws and used these for decoration.

Serves 24.

If you like this recipe, try these:

Vegan Lemon Cupcakes with Cream Cheese Frosting

Vegan Chocolate Mint Cookie Cake

Southern Vegan Strawberry Shortcake

A closeup of vegan mojito cupcakes

Vegan minty lime mojito cupcakes. Soft lime cake topped with minty lime vanlla vegan buttercream.

Vegan Fried Green Tomato Sandwich with Bacon and Mozzarella

Fried green tomato and arugula sandwich on sourdough bread, cut in half.

The only thing I love more than a crispy fried green tomato, is a fried green tomato sandwich. We paired our perfect vegan fried green tomatoes, with our all mozzarella-like all purpose vegan cheese sauce, crispy vegan bacon, and tangy red pepper and garlic remoulade!

Seriously if you haven’t made your own vegan fired green tomatoes yet, why?!?!? I know this is definitely a southern thing, but it does not matter where you live. If you can find green tomatoes, buy them, and fry them. I you can’t find them in a store, grown your own, pick them green, and fry them!! You will thank me for this later if you have never had a vegan fried green tomato!! Promise

This is one of my all time favorite summertime sandwiches!! Its tangy, creamy, crispy and perfect! Put it on a toasted grainy bread or try our Easy Vegan Sandwich Bread recipe! Either way you can’t go wrong!


INGREDIENTS:


INSTRUCTIONS:

preheat oven to 350 degrees

  1. If making the rice paper bacon, prepare according to directions, or cook store bought bacon and set aside.

  2. Prepare Vegan Fried Green Tomatoes according to directions.

  3. Prepare cheese sauce according to directions but allow it to get pretty thick. You want more of a soft mozzarella consistency vs a sauce. It will thicken as it cooks and cools.

  4. Spread the cheese on 4 pieces of bread. Place all 8 pieces of bread right on the top rack of your oven ( not on a pan) allowing it to toast for about 5 minutes. This will also reheat the cheese.

  5. Spread remoulade on the other slices of bread once you remove them from the oven.

  6. Place bacon on the cheese side of the bread, then top with 2 to 3 slices of fried green tomatoes, and arugula. Top teach sandwich with a remoulade covered piece of toast and serve.

If you like this recipe, try these:

Easy Vegan Sandwich Bread

BBQ Tofu Sandwich with Pickled Veggies

Open Faced Vegan Roast “Beef” Sandwich with

Jackfruit

Fried green tomato and arugula sandwich.

crispy fried green tomato sandwich with vegan mozzarella and roasted red pepper and garlic remoulade

Vegan Cheesy Tater Tot Casserole

A baking dish of tater tot caserole with a plate of caserole in the foreground.

My mom doesn’t love to cook. That said, she taught me most of what I know about cooking, and is actually a really good cook (if you ask her she will claim the opposite, I think just to get her out of the task she doesn’t enjoy.) Since going vegan I have really missed some of the dishes she always made us. One of my favorite easy dishes she always makes is tater tot casserole. It’s cripsy tater tots, ground meat, all the “cream of” soups, and piles and piles of cheese. It took me a few tries to veganize this favorite comfort food, but once I did, it was game on. Obviously my kids love this dish! It has kids casserole written all over it. But I am a fully grown women and always go back for seconds. We use our easy vegan all purpose cheese sauce to sub in for all the “cream of” soups and the cheesy top! It works like a dream. You can use any meatless crumbles you like, but we always just thaw some Beyond Burgers and crumble them up. As a side note, I started finding Beyond Burgers at Costco and for half the price you find them at the grocery store, so be on the lookout if you are a Costco shopper! if you have ever had tater tot casserole in you per vegan days, and have been missing it, it’s finally time to rejoice. If you have never had it, let me tell you, it’s the most comforting, easy, gooey, cheesy, casserole recipe, ever!!! And thanks again to my mom for teaching me how to cook all those years ago!!

INGREDIENTS:

  • 1 bag frozen tater tots

  • 1 yellow onion

  • 1 package meatless crumbles, or we used 3 thawed Beyond Meat Burgers

  • 1 batch Easy Vegan All Purpose Cheese Sauce, divided

  • 1 1/2 teaspoons turmeric

  • 1 teaspoon smoked paprika

INSTRUCTIONS:

preheat oven to 350 degrees

  1. Line a 9x13 pan with a single layer of tater tots.

  2. Dice yellow onion. Heat a large skillet over medium heat. Sray the pan with a little oil, and add the onion. Cook until the onion is soft and translucent.

  3. Add the meatless crumbles or the thawed burgers. If using the burgers, break them up using a spatula and cook until the “meat” is cooked though. Sprinkle the “meat” evenly over the tater tots.

  4. Prepare the cheese sauce according to the directions. Divide the heated sauce. Pour half of the sauce over the tater tots and meatless crumbles, using a spatula to evenly spread it. Leave the other half of the sauce in the pan.

  5. Add 1 and 1/2 teaspoons turmeric and 1 teaspoon smoked paprika to the other half of the sauce and whisk well. This will give the sauce a smokey cheddar flavor and color.

  6. Evenly spread the cheddar sauce over the top of the casserole and bake for 30 minutes.

  7. Allow to cool a little before serving.,

If you like this recipe, try these:

“Chicken” Divan with Jackfruit

Vegan Lentil Shepherd’s Pie

Vegan Italian Noodle Bake

Classic tater tot casserole made vegan using our easy all purpsoe vegan cheese sauce

Crunchy Ramen Noodle Salad

A quick and easy Crunchy Ramen Noodle Salad.

Crunchy Ramen Noodle Salad was a staple at every pot luck or family get together we had growing up. It is seriously so quick and easy to make, and really, just addictive.

The crunch of the cabbage and ramen noodles, mixed with diced green onions, and sliced almonds, and tossed in best sweet and savory asian dressing makes for a perfect summer side. I could seriously eat this salad every day in the summer months!

My kids were pretty skeptical at first, but once they tried it, they all loved it!! I like it just the way it is, but you can add shredded carrots or diced peppers if you like. I personally love the simplicity of this recipe just the way it is, and it is just like the ramen salad I ate growing up. I guess I believe some things just don’t need changing!

This recipe is also great for holidays and pot lucks. Its cheap and easy to make and everyone always loves it. I love having super affordable side options like this, especially when I was not prepared to make and take something to a gathering. This certainly won’t break the bank!

I also think its an easy way to get my kids to eat cabbage. This recipe is pretty healthy and is also really good with some grilled tofu on top, or on top of a vegan carrot dog. No matter what you serve it with, just make sure you are making this delicious and easy vegan side!! It is seriously just so good!

INGREDIENTS:

  • 1/2 head of green cabbage, chopped ( about 5 cups)

  • 2 packages ramen noodles (you do not need the spice packet)

  • 3 green onions

  • 1/3 cup sliced almonds

ASIAN SLAW DRESSING:

  • 1/4 apple cider vinegar

  • 3 tablespoon soy sauce or coconut aminos

  • 1 teaspoon sesame oil

  • 1 tablespoon white sugar

INSTRUCTIONS:

  1. Dice green onions, and add them to a large bowl along with the chopped cabbage.

  2. Crush up the dried ramen noodles into the cabbage mixture, and add the sliced almonds.

  3. Whisk together the ingredients for the dressing and pour it over the cabbage. Stir well.

  4. Serve at room temp or chilled. Store any leftovers in an airtight container in the fridge.

If you like this recipe, try these:

Raw Sesame Zucchini Noodle Salad

Brussels Sprout Slaw with Sweet Mustard and Maple walnuts

Quick and Easy Pickled Veggies

IMG_3449.jpg

Crunchy cabbage and ramen noodle salad with green onions and sliced almonds, tossed in a sweet and savory asian style dressing

Southern Vegan Strawberry Shortcake

Southern strawberry shortcake a la mode garnished with mint

I had always eaten strawberry shortcake on angel food cake, or short bread. I would imagine this is how most people have eaten it.

That is until I began waiting tables in college, and the restaurant where I worked served it on fluffy biscuits.

My mind was blown, y’all. How was I raised in the south, and nobody in my family ever thought to do this. From that point on, it has been the ONLY way I want to eat strawberry shortcake.

Trust me when I tell you that you will probably be swayed as well.

We started with our fluffy southern vegan biscuit recipe, used our sweet aquafaba whip, some vegan vanilla ice cream, and topped it all with a quick strawberry compote. You could even up your game and add vegan strawberry ice cream in place to the vanilla.

You are a grown person, and you can do WHATEVER THE HECK YOU WANT TO DO!!! I mean, as long as its legal! You know what I am saying…

This southern vegan strawberry shortcake is seriously heaven on a plate!! So y’all, go make bake up a batch of biscuits right this minute and get ready to be real happy!


INGREDIENTS:


INSTRUCTIONS:

  1. Prepare biscuits according to recipe.

  2. Prepare Sweet Aquafaba Whip according to instructions. You can rewhip any leftovers easily, or bake up meringues with it!

  3. Add frozen strawberries and sugar to a medium sized pot over medium heat. Once the strawberries are melted, lower the heat and let the mixture simmer for about 15 minutes stirring often. You want the strawberries broken down and a strawberry syrup to form in the pot. Let cool for 10 minutes.

  4. To serve, slice biscuits in half and place on a plate. We normally use 1 and 1/2 biscuits per serving. Scoop some strawberries on top of the biscuits. Add a scoop of ice cream and a dollop of sweet aquafaba whip. Drizzle with more strawberries.

Serves 4-6


Overhead view of a souther strawberry shortcake a la mode, garnished with mint.

vegan strawberry shortcake with fluffy southern vegan biscuits

Easy Vegan All Purpose Cheese Sauce

Vegan cheese sauce dripping from a spoon into a copper pot

One of the most basic and useful recipes I have, is this one. Seriously, it is vegan recipe that first gave me hope that I could do this! I could give up cheese, and survive to tell about it!

This easy vegan all purpose cheese sauce is something I almost always have on hand. It is a very convincing, ooey, gooey, white cheese. It keep well in the fridge and comes together in just minutes!

The base is cashews which work really well for substituting dairy. They break down super well and are extra creamy making them a popular ingredient in vegan cheeses.

If you are allergic to nuts, you can easily sub them out with sunflower or pumpkin seeds!! It works just fine!

You can use this vegan cheese sauce for pizza, pastas, grilled cheese, seriously so many different things.

The longer you cook it, the thicker and stretchier making it work really well as a quick vegan mozzarella. I actually perfect this cheese sauce on pizza and I make a LOT of vegan cheeses, including shredded mozzarella and soft mozzarella. This sauce is just so quick and so delicious I see no need to make things harder than they need to be!

The spice profile is pretty basic and can be changed up depending on what you are using it for.

Also check out our cashew queso recipe. It has a nice spicy kick and works well for quesadillas, and enchiladas, and tacos.


INGREDIENTS:

  • 1 cup cashews

  • 2 cups water, plus water for soaking nuts

  • 4 tablespoons tapioca starch

  • 1/4 cup Sauerkraut, no juice

  • 3-4 tablespoons nutritional yeast (I tend to lean towards being more heavy handed with the nutritional yeast. Adjust to your taste)

  • 1 teaspoon minced garlic

  • 1 teaspoon salt

  • 1 tablespoon apple cider vinegar


INSTRUCTIONS:

  1. Place cashews in a microwave safe container and cover in water. Microwave for 3 minutes. Drain water and rinse. If you do not have a microwave, you can boil them in a pot of water for 5 minutes or you can soak them for a few hours in hot water.

  2. Add drained cashews, 2 cups clean water, and remaining ingredients to a high speed blender and process until the mixture is totally and completely smooth. This may take a minute or two of blending.

  3. Transfer mixture to a medium sized pot over medium heat. Heat the mixture for a few minutes, stirring continuously with a whisk until the mixture begins to thicken. Once desired consistency, remove from heat. If it gets too thick, you can add a little more water to thin it back out.

  4. Depending on what I am using the sauce for, depends on how thick I will allow it to get. If using it for pizza, then I will let it get pretty thick so I can dollop it on top of the pizza. If using it in a lasagna or in enchiladas, I will keep it at a thick pudding constancy so it’s easier to spread. You can use it as an alfredo sauce, just keep it on the thinner side. Feel free to add any extra spices depending on what you are using it for!


You can use this sauce for:

pizza, lasagna, enchiladas, as an alfredo sauce, stuffed shells, calzones, quesadillas, mac and cheese, cheese spread for sandwiches, grilled cheese, just to name a few

If you like this recipe, try these:

Cashew Queso

“Meaty” Cheddar Queso

Spicy Vegan Queso, Nut Free


My favorite vegan cookbook is “Veganize It!” by Robin Robertson. I adapted and made some changes to her recipe for cashew pizza “cheese” to create this basic all purpose cheese sauce. If you are in the market for some great vegan cook books, be sure to check her’s out. Find a copy of Vegaize It at amazon or a local bookstore. I can not praise this woman enough.

Easy all purpose cashew based vegan cheese sauce. Perfect for vegan pizza, pasta, or sandwiches!

Vegan Fried Green Tomatoes

Delicious fried green tomatoes with non dairy goat cheese

Every spring I eagerly wait for tomato season to start, simply so I can make fried green tomatoes! Seriously, I could eat them every single day.

Actually in Florida, we can grown tomatoes again in the winter months. This is one more reason I adore living here. Double grow season for tons of veggies.

I love all tomatoes actually, but fried green tomatoes are a whole different level of love for me. Growing up in the south, fried green tomatoes are a staple. Again, we will fry just about anything down here!

For this recipe, we paired vegan fried green tomatoes with a perfect roasted red pepper and garlic remoulade and vegan feta. The sauce is not hard to make and super delicious not only on this recipe but on lots of things.

You can either buy a vegan feta or make your own from tofu. We linked the recipe and if you have time to make a batch, its totally worth the effort!

These vegan fried green tomatoes make th perfect light side or meal. So if you are growing tomatoes, go ahead and pick some green ones and fry them up.

You can also normally find green tomatoes (in the south anyways) in grocery stores in the summer months, as well. Fingers crossed you find some, and love this easy southern staple as much as we do!


INGREDIENTS:

  • 2 - 3 green tomatoes

  • 1/3 cup all purpose flour

  • 1/3 cup panko bread crumbs (many are not vegans so be sure to check)

  • 1/3 - 1 cup plain unsweet non dairy yogurt

  • 1 teaspoon garlic powder

  • 1 teaspoon onion powder

  • 1 teaspoon smoked paprika

  • 1 teaspoon salt

  • 1/2 teaspoon black pepper

  • 1 teaspoon dried parsley

  • 1/2 cup Roasted Red Pepper and Garlic Remoulade (if refrigerated, allow it to come to room temperature)

  • vegan feta cheese, homemade or store bought

  • 1/4 cup fresh basil

  • neutral oil for frying, like grassed or canola


INSTRUCTIONS:

  1. Slice tomatoes about 1/4 of an inch thick. Sprinkle with a little salt.

  2. Add the yogurt to a shallow dish. In a separate shallow dish, add the bread crumbs, flour and seasonings and given them it a stir.

  3. Start by dipping and coating the tomatoes slices in the yogurt. Next dip them into the flour and bread crumb mixture, making sure they are fully coated.

  4. Line a baking sheet with a few paper towels and place a wire cooling rack on top.

  5. Heat a large skillet over medium heat with an inch or so of oil. Once the oil is nice and hot, add 3 or 4 tomato slices at a time. Allow them to fry on each side for a few minutes or until they are crispy and golden brown.

  6. Let tomatoes cool on the wire rack for a few minutes. This helps extra oil drip off as well.

  7. Repeat with remaining tomatoes.

  8. To serve, add a few spoon fulls of remoulade on a plate. Stack 3 tomatoes on top and sprinkle with feta and some fresh basil.


Roasted Red Pepper and Garlic Remoulade (vegan)

Roast Red Pepper Sauce with a dipping spoon

I love a good sauce for sandwiches or for dipping my fries. I also love roasted red peppers and garlic, so this roasted red pepper and garlic remoulade is a personal favorite. This sauce comes together very quickly and can be used for so many things. Use it as sandwich spread, dip, a sauce for grilled or roasted veggies, or even a dip for our vegan fried cheese grits or fried green tomatoes.

INGREDIENTS:

  • 1/2 cup vegan mayo

  • 2 roasted red bell peppers

  • 2 teaspoons minced garlic

  • 1 tablespoon lemon juice

  • 1 teaspoon smoked paprika

  • 1 teaspoon vegan Worcestershire sauce

  • 1 teaspoon salt

  • 1/2 black pepper

INSTRUCTIONS:

  1. Add all of the ingredients to a blender and mix until smooth. Store in an airtight container in the fridge.

  2. Use as a dipping sauce for fries or veggies or as a spread for sandwiches.

If you like this recipe, try these:

Vegan Alabama White Sauce

Lemon Tahini Dressing

Vegan Ranch

quick and easy vegan roasted red pepper and garlic remoulade